DRAW
User Guide
Add and Modify Drawing Objects : Modify Drawing Objects : Offset Objects
To offset objects with a specified offset distance, on the Draw tab, in the Modify group, click Offset.
The user is prompted to Specify the offset distance or <Through>
Input a dimensional value in the field and press Enter or click to identify the first point required to specify the offset distance.
The user is then prompted to Specify the second point
Input values in the dimension fields and press Enter or click to identify the second point required to specify the offset distance (from the first point).
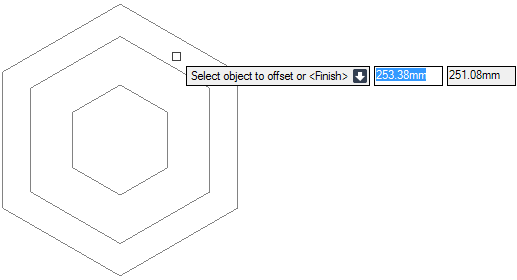
The user is then prompted to Select object to offset or <Finish>
The user is then prompted to Specify a point on side to offset or <Finish>
The Select object to offset or <Finish> and Specify a point on side to offset or <Finish> prompts are repeated, allowing the user to create multiple offset objects at the specified distance.
Throughout the offset process the user can press ESC to cancel the command. Additional functionality is also available.
 |
|
|
Press the down arrow key and select Delete to specify deletion options for the source objects after offsetting.
Input Y at the prompt and press Enter to delete the source objects or input N at the prompt and press Enter to retain the source objects.
|
|
|
Press the down arrow key and select Finish to end the command.
|
|
|
Press the down arrow key and select Layer to offset objects to a picture owner or original object layer. Refer to Offset Objects to Picture Owner or Original Object Layer for further information.
|
|
|
Press the down arrow key and select Multiple to offset the selected object multiple times.
|
|
|
Press the down arrow key and select Through to offset objects with a specified a through point. Refer to Offset Objects with Specified Through Point for further information.
|
|
|
Press the down arrow key and select To point to offset objects with a specified point.
|
|
|
Press the down arrow key and select Undo to undo the last action.
|
|
To offset objects with a specified through point, on the Draw tab, in the Modify group, click Offset.
The user is prompted to Specify the offset distance or <Through>
The user is then prompted to Select object to offset or <Finish>
The user is then prompted to Specify through point or <Finish>
The Select object to offset or <Finish> and Specify through point or <Finish> prompts are repeated, allowing the user to create multiple offset objects using a through point.
Throughout the offset process the user can press ESC to cancel the command. Additional functionality is also available.
|
|
|
|
Press the down arrow key and select Delete to specify deletion options for the source objects after offsetting.
Input Y at the prompt and press Enter to delete the source objects or input N at the prompt and press Enter to retain the source objects.
|
|
|
Press the down arrow key and select Finish to end the command.
|
|
|
Press the down arrow key and select Layer to offset objects to a picture owner or original object layer. Refer to Offset Objects to Picture Owner or Original Object Layer for further information.
|
|
|
Press the down arrow key and select Multiple to offset the selected object multiple times.
|
|
|
Press the down arrow key and select Through to offset objects with a specified a through point.
|
|
|
Press the down arrow key and select To point to offset objects with a specified point.
|
|
|
Press the down arrow key and select Undo to undo the last action.
|
|
To offset objects to the picture owner or original object layer, on the Draw tab, in the Modify group, click Offset.
The user is prompted to Specify the offset distance or <Through>
The user is then prompted to Enter layer option for offset objects <Source>
Input S at the prompt and press Enter to create the offset objects on the same layer as the original objects or Input C at the prompt and press Enter to create the offset objects on the current layer.
The user is then prompted to Specify the offset distance or <Through>