Multi-Discipline Supports
User Guide
Add Snipes to Steelwork Members : Create Snipes : Manually Created Snipes
To create/modify snipes manually, on the Sections tab, in the Tools group, click Snipe to display the Snipes window.
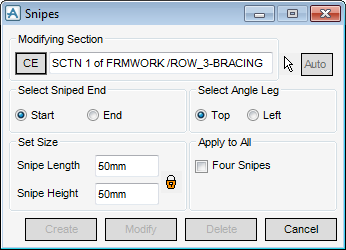
Identify the section which is to have a snipe added by entering a name in the Modifying Section text box or clicking CE to modify the current element, if it is an angle section.
Make the required selection using the Select Sniped End radio button. If the Identify by Cursor icon  is activated, then the sniped end of the angle section can be picked directly from the 3D graphical view. If the Auto function is enabled, the snipe is created immediately after picking, to speed up the process.
Enter values into the Snipe Length and Snipe Height fields. If the Lock/Unlock icon  is activated, the two values are locked together, and changing one changes the other.
Click Create to confirm creation of the snipe.
Repeat the above steps to create further snipes. Click Cancel to terminate snipe creation.
Click Delete to remove an existing snipe.