Structural Design
User Guide
Walls and Floors Tools : Split a Wall
It may be necessary during the design process to split a straight wall that already exists into shorter lengths where it intersects with another element. On the WALLS AND FLOORS tab, in the Tools group, click Split Wall to display the Split Walls window.The window must be populated before any elements can be picked in the 3D graphical view.
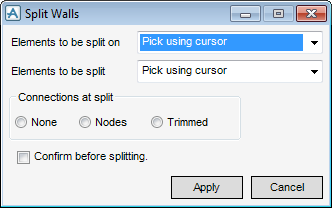
The only method to select Elements to be split on and Elements to be split in the 3D graphical view is Pick using cursor.
From the Connections at split pane of the Split Walls window, the user can specify how the ends of the new shorter length walls are to be connected at the split points:
By default, the Confirm before splitting checkbox is selected, this means a Confirm window is automatically displayed before each split occurs.
Click Apply, the user is prompted to ‘Identify item to be split on:’. Pick these items in the 3D graphical view which determine the split points. When the items have been picked, press Esc.
The user is then prompted to ‘Identify wall to be split:’. Pick the walls to be spilt in the 3D graphical view. When these items have been picked, press Esc.
When the wall has been identified click Esc. If the Confirm Before Splitting box is selected a Confirm window is displayed.
Click Yes to split the walls
Click No to discard any inputs and close the window.