Structural Design
User Guide
Create Walls : Straight Wall
To create a straight wall, on the Walls and Floors tab, in the Create group, click Walls, select Straight Wall from the drop-down list to display the Straight Wall window. 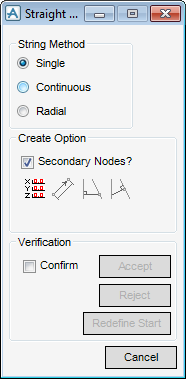
The Positioning Control window is also displayed, the positioning functionality available for selection is common throughout all design disciplines, refer to Common Functionality Guide for further information. The user is prompted to ‘Define Straight wall start (Snap) Snap:’
From the Straight Wall window there are three options by which walls are created available to the user:
|
•
|
Single - Start and End points are individually defined for each section.
|
|
•
|
Continuous - Start point of subsequent walls is the end point of previous.
|
|
•
|
Radial - Start point for subsequent walls is the same as the first.
|
The user must define the start of the wall explicitly by entering explicit X,Y and Z co-ordinates. From the Create Option pane of the Straight Wall window, select Define Start/End Explicitly. The Define straight wall start is displayed.
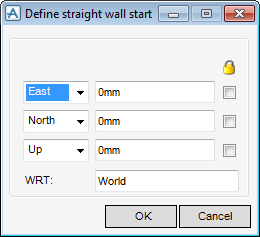
Enter the required East, North and Up co-ordinates and the Start position is shown in the graphical view. The default wrt World defines the co-ordinate system by which the position is specified.
If the start position is not in the correct place click Redefine Start to start again.
Click OK to confirm the entered co-ordinates and activates all the functionality available from the Create Option display. The user is also prompted to Define straight wall end (Snap) Snap:.
The end position may be defined in several ways, from the Create Option pane of the Straight wall window:
Click Define Start/End Explicitly to display the Define Straight Wall End window which is used in exactly the same way as the Define Straight Wall Start window.
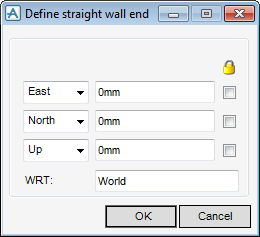
Click OK to confirm the entered co-ordinates or click Cancel to discard any inputs and close the Define straight wall end window.
Click Define end a given distance and direction from start to display a Define straight wall end window.
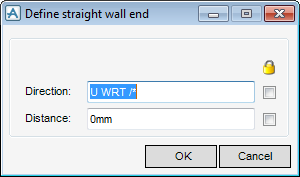
Enter a direction with respect to the World or other co-ordinate system and the required distance from the wall start position. Click OK and the end position is shown in the graphical view briefly before the wall is shown.
Click Perpendicular from to create a wall perpendicular to the wall specified for the new wall start. The user is prompted to ‘Pick straight Section/Wall to derive perpendicular from:’.
Click Perpendicular to create a wall perpendicular to a selected wall. The user is prompted to ‘Pick straight Section/Wall to derive perpendicular end to:’.
If the Confirm check box in the Verification window is selected a line is drawn in the graphical view to show the position of the wall. Click Accept to draw the new wall or Reject to start again.