Equipment
User Guide
Equipment : Import/Export DGN : Export DGN
To run the Export-DGN tool, on the Equipment tab, in the Export group, click DGN to display the DGN Export window.
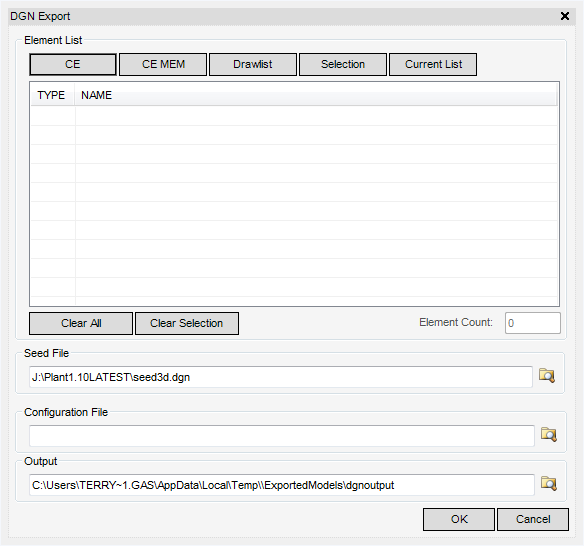
Choose the Model Elements to export using the Element List options.
Click OK to export the chosen Elements.
|
•
|
The user can use the export option 'seedfile' '<filename>' command in MODEL to set the path of the seed file (note that the path of the file is needed, not the path of the folder, as in the case of the environment variable). For example
|
|
•
|
If the export option 'seedfile' is not set, then ExPLANT-I looks for a file named seed3d.dgn in a folder or search-path set in the environment variable SEED3D_DIR.
|
|
Note:
|
To use a configuration file, either the environment variable EXPLANT_CONFIGURATION must be set to the path of the configuration file; or the AVEVA E3D™ command export option 'configuration' '<filename>' must be called to set up a temporary path to the configuration file.
|
The Export command was designed as a what-the user-see-is-what-the user-get system, where the visibility and representation settings in MODEL control what is exported. The user can select certain elements of the database for export, and choose an appropriate level of detail for their needs.
If the model to export is large, then it is a lot quicker to output the file if the user enters the device tty mode rather than the graphics mode of MODEL and then switch tracing off (trace off) and set the representation as required. The MODEL EXPORT commands can be stored in a AVEVA E3D™ macro file.
|
Export option 'seedfile'
'c:\seedfiles\seed1.dgn' |
|
Refer to Element Representation for further information of powerful colour selection and element selection techniques.
Whenever AVEVA ExPLANT-I is run, it writes a log file. The log file has the same name as the dgn file, but with a .log extension rather than .dgn. If a message or warning is printed by MODEL, further details are usually in the log file.