DRAW Administrator Guide
Automatic Drawing Production : General ADP : Set ADP Defaults
To set ADP defaults, on the Auto tab, in the Defaults group, click General to display the ADP Defaults File Editor window.
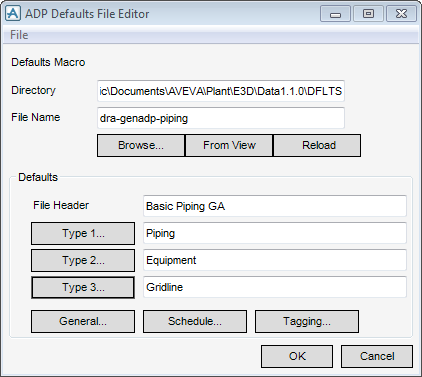
Default settings can be loaded from a file, which may be either the current DRAW defaults file or defaults from a different named file. To load default settings from a file, click File at the top of the window and select Load From from the drop-down list to display the Load defaults file from window. The Load defaults file from window, lists the files in the given directory. The administrator can select the required file.
|
Note:
|
Alternatively, the administrator can click Browse on the ADP Defaults File Editor window to display the Load defaults file from window.
|
If the current display contains an ADP Drawing, select From View and pick any item in the View. The Defaults file used to create the View is loaded.
When a defaults file is loaded, the ADP Defaults File Editor window is populated with details from the file. The administrator can change the defaults as required.
The File Header text box displays a description of the type of defaults.
The text boxes labelled Type 1, Type 2 and Type 3 display the type of dimensions controlled by the given types. As supplied, Type 1 is Piping, Type 2 is Equipment and Type 3 is Gridline. Not all types are used in all default files: when a type is not used in the current default file, Unused displays.
To define ADP piping dimension defaults, click Type 1. Refer to Type 1 Defaults for further information.
To define ADP equipment dimension defaults, click Type 2. Refer to Type 2 Defaults for further information.
To define ADP gridline dimension defaults, click Type 3. Refer to Type 3 Defaults for further information.
To define general ADP defaults, click General. Refer to General ADP Defaults for further information.
To define ADP schedule defaults, click Schedule. Refer to ADP Schedule Defaults for further information.
To define ADP tagging defaults, click Tagging. Refer to ADP Tagging Defaults for further information.
Click OK to apply the ADP defaults or Cancel to discard any changes and close the ADP Defaults File Editor window.
To define ADP piping dimension defaults, on the ADP Defaults File Editor window, click Type 1 to display the ADP Defaults - Type 1 window.
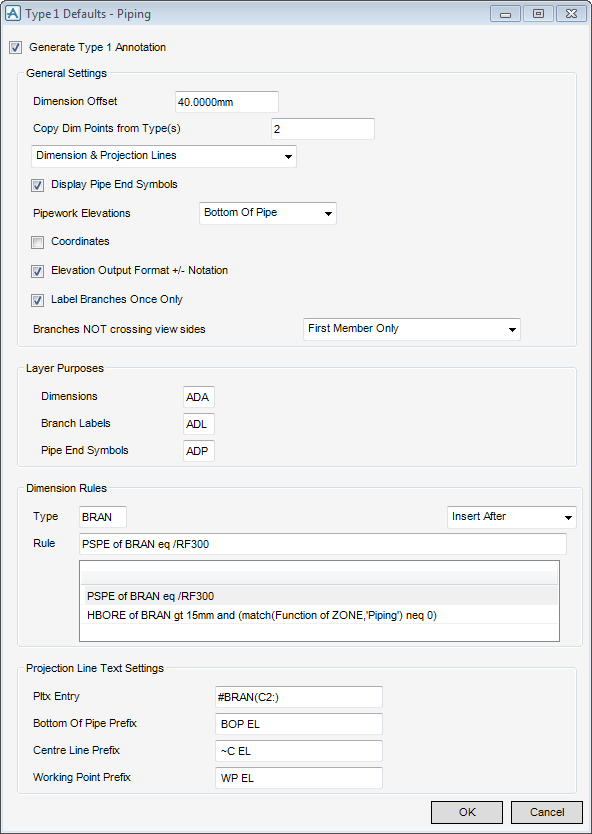
The ADP Defaults - Type 1 window allows the administrator to define default ADP piping dimension settings and rules.
|
Input 2 to define that equipment centre dimensions can be inherited.
Input 3 to define that gridline dimensions can be inherited.
|
|
|
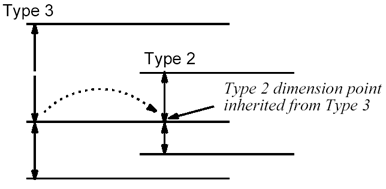
Select Dimension and Projection Lines from the drop-down list to define that inherited dimension points are for both dimension and projection lines.
Select Projection Lines Only from the drop-down list to define that inherited dimension points are for projection lines only.
|
|
|
Select Bottom of Pipe from the drop-down list to define that inherited dimension points elevate from the bottom of the pipe.
Select Centre Line from the drop-down list to define that inherited dimension points elevate from the centre line of the pipe.
Select Off from the drop-down list to turn off pipework elevations.
|
|
|
Select No Dimensions from the drop-down list to define that no dimensions display on pipe branches.
Select First Member Only from the drop-down list to define that only the dimension for the first member in a pipe branch displays.
Select Last Member Only from the drop-down list to define that only the dimension for the last member in a pipe branch displays.
Select First & Last Members from the drop-down list to define that dimensions for the first and last members in a pipe branch display.
|
|
|
Select Insert After from the drop-down list to insert the Rule after the selected Rule in the Dimension Rules list.
Select Insert Before from the drop-down list to insert the Rule before the selected Rule in the Dimension Rules list.
|
|
Click OK to apply the settings or Cancel to discard any changes and close the ADP Defaults - Type 1 window. The administrator is returned to the ADP Defaults File Editor window.
To define ADP equipment dimension defaults, on the ADP Defaults File Editor window, click Type 2 to display the ADP Defaults - Type 2 window.
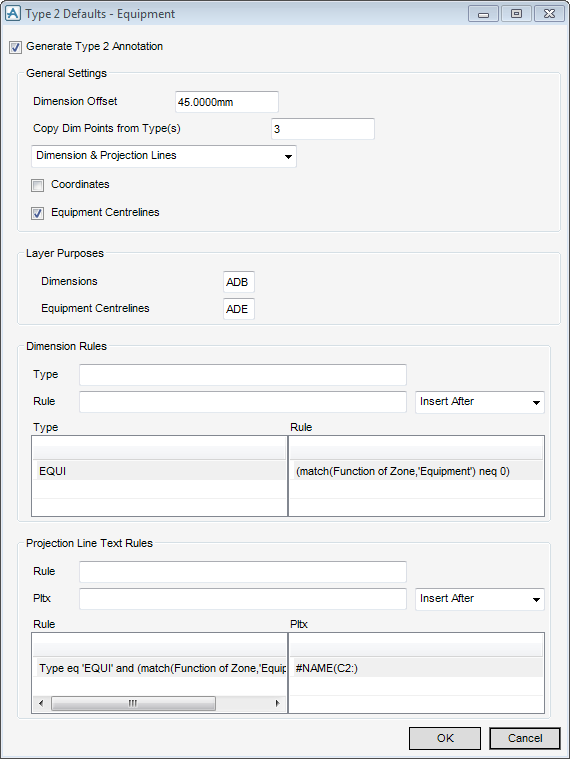
The ADP Defaults - Type 2 window allows the administrator to define default ADP equipment dimension settings and rules.
|
Input 1 to define that pipework dimensions can be inherited.
Input 3 to define that gridline dimensions can be inherited.
|
|
|
Select Dimension and Projection Lines from the drop-down list to define that inherited dimension points are for both dimension and projection lines.
Select Projection Lines Only from the drop-down list to define that inherited dimension points are for projection lines only.
|
|
|
Select Insert After from the drop-down list to insert the Rule after the selected Rule in the Dimension Rules list.
Select Insert Before from the drop-down list to insert the Rule before the selected Rule in the Dimension Rules list.
|
|
|
Select Insert After from the drop-down list to insert the Rule after the selected Rule in the Projection Line Text Rules list.
Select Insert Before from the drop-down list to insert the Rule before the selected Rule in the Projection Line Text Rules list.
Select Copy from the drop-down list to copy the selected Rule in the Projection Line Text Rules list.
Select Replace from the drop-down list to replace the selected Rule in the Projection Line Text Rules list.
Select Cut from the drop-down list to remove the selected Rule from the Projection Line Text Rules list.
|
Click OK to apply the settings or Cancel to discard any changes and close the ADP Defaults - Type 2 window. The administrator is returned to the ADP Defaults File Editor window.
To define ADP gridline dimension defaults, on the ADP Defaults File Editor window, click Type 3 to display the ADP Defaults - Type 3 window.
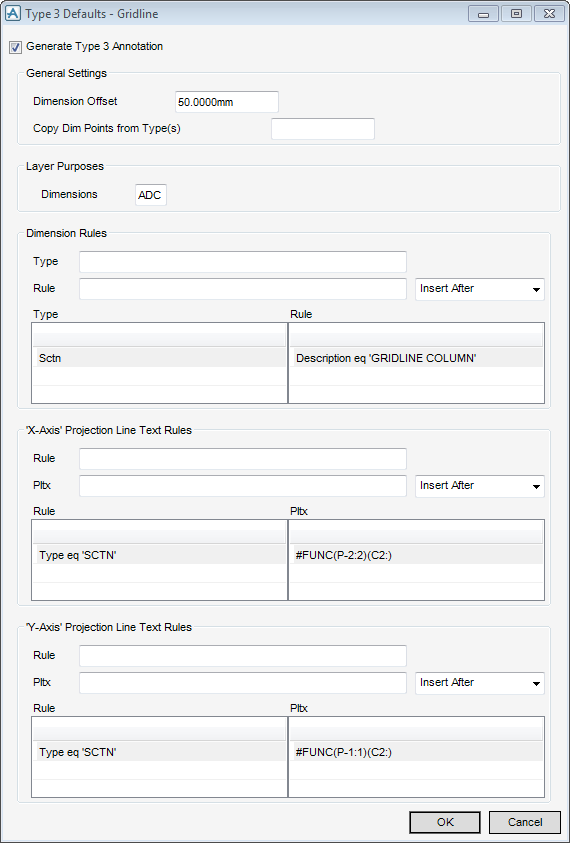
The ADP Defaults - Type 3 window allows the administrator to define default ADP gridline dimension settings and rules.
|
Input 1 to define that pipework dimensions can be inherited.
Input 2 to define that equipment centre dimensions can be inherited.
|
|
|
Select Dimension and Projection Lines from the drop-down list to define that inherited dimension points are for both dimension and projection lines.
Select Projection Lines Only from the drop-down list to define that inherited dimension points are for projection lines only.
|
|
|
Select Insert After from the drop-down list to insert the Rule after the selected Rule in the Dimension Rules list.
Select Insert Before from the drop-down list to insert the Rule before the selected Rule in the Dimension Rules list.
|
|
|
Select Insert After from the drop-down list to insert the Rule after the selected Rule in the ‘X-Axis’ Projection Line Text Rules list.
Select Insert Before from the drop-down list to insert the Rule before the selected Rule in the ‘X-Axis’ Projection Line Text Rules list.
Select Copy from the drop-down list to copy the selected Rule in the ‘X-Axis’ Projection Line Text Rules list.
Select Replace from the drop-down list to replace the selected Rule in the ‘X-Axis’ Projection Line Text Rules list.
Select Cut from the drop-down list to remove the selected Rule from the ‘X-Axis’ Projection Line Text Rules list.
|
|
|
Select Insert After from the drop-down list to insert the Rule after the selected Rule in the ‘Y-Axis’ Projection Line Text Rules list.
Select Insert Before from the drop-down list to insert the Rule before the selected Rule in the ‘Y-Axis’ Projection Line Text Rules list.
Select Copy from the drop-down list to copy the selected Rule in the ‘Y-Axis’ Projection Line Text Rules list.
Select Replace from the drop-down list to replace the selected Rule in the ‘Y-Axis’ Projection Line Text Rules list.
Select Cut from the drop-down list to remove the selected Rule from the ‘Y-Axis’ Projection Line Text Rules list.
|
Click OK to apply the settings or Cancel to discard any changes and close the ADP Defaults - Type 3 window. The administrator is returned to the ADP Defaults File Editor window.
To define general ADP defaults, on the ADP Defaults File Editor window, click General to display the General ADP Defaults window.
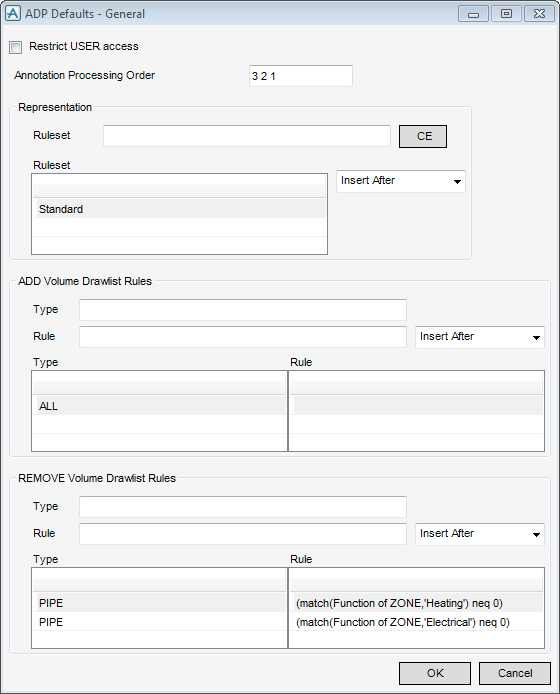
The General ADP Defaults window allows the administrator to restrict ADP user access, set the annotation processing order and define representation rulesets.
|
When the check box is selected, the user can modify some defaults from the Modify User Defaults window which is accessible to members of the DRAWADMIN team.
|
|
|
Input the order in which the different types of annotation are processed. The default value is 3 2 1.
 |
|
|
If the standard Representation Rulesets are required, input Standard in the field.
Click CE to identify the currently selected Representation Ruleset as the working element.
Select Insert After from the drop-down list to insert the Ruleset after the selected Ruleset in the Ruleset list.
Select Insert Before from the drop-down list to insert the Ruleset before the selected Ruleset in the Ruleset list.
|
|
|
Select Insert After from the drop-down list to insert the Rule after the selected Rule in the ADD Volume Drawlist Rules list.
Select Insert Before from the drop-down list to insert the Rule before the selected Rule in the ADD Volume Drawlist Rules list.
Select Copy from the drop-down list to copy the selected Rule in the ADD Volume Drawlist Rules list.
Select Replace from the drop-down list to replace the selected Rule in the ADD Volume Drawlist Rules list.
Select Cut from the drop-down list to remove the selected Rule from the ADD Volume Drawlist Rules list.
|
|
|
Select Insert After from the drop-down list to insert the Rule after the selected Rule in the REMOVE Volume Drawlist Rules list.
Select Insert Before from the drop-down list to insert the Rule before the selected Rule in the REMOVE Volume Drawlist Rules list.
Select Copy from the drop-down list to copy the selected Rule in the REMOVE Volume Drawlist Rules list.
Select Replace from the drop-down list to replace the selected Rule in the REMOVE Volume Drawlist Rules list.
Select Cut from the drop-down list to remove the selected Rule from the REMOVE Volume Drawlist Rules list.
|
Click OK to apply the settings or Cancel to discard any changes and close the ADP Defaults - General window. The administrator is returned to the ADP Defaults File Editor window.
To define ADP schedule defaults, on the ADP Defaults File Editor window, click Schedule to display the ADP Defaults - Schedules window.
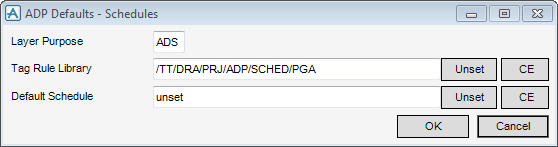
The ADP Defaults - Schedules window allows the administrator to define the layer purpose, tag rule library and default schedule for the ADP drawing.
|
Select Unset if a tag rule library is not required for the ADP default schedule.
|
|
|
Select Unset if a default schedule is not required.
|
Click OK to apply the settings or Cancel to discard any changes. The administrator is returned to the ADP Defaults File Editor window.
To define ADP tagging defaults, on the ADP Defaults File Editor window, click Tagging to display the ADP Defaults - Tagging window.
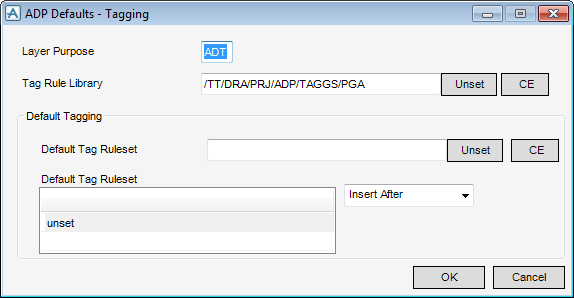
The ADP Defaults - Tagging window allows the administrator to define the layer purpose, tag rule library and default tagging rulesets for the ADP drawing.
|
Select Unset if a tag rule library is not required for ADP tagging defaults.
|
|
|
Select Unset if a default tag ruleset is not required in ADP tagging defaults.
Select Insert After from the drop-down list to insert the Default Tag Ruleset after the selected default tag ruleset in the Default Tag Ruleset list.
Select Insert Before from the drop-down list to insert the Default Tag Ruleset before the selected default tag ruleset in the Default Tag Ruleset list.
Select Copy from the drop-down list to copy the selected default tag ruleset in the Default Tag Ruleset list.
Select Replace from the drop-down list to replace the selected default tag ruleset in the Default Tag Ruleset list.
Select Cut from the drop-down list to remove the selected default tag ruleset from the Default Tag Ruleset list.
|
Click OK to apply the settings or Cancel to discard any changes. The administrator is returned to the ADP Defaults File Editor window.