Cable Design
User Guide
Cableway Branch : Create Cableway Branch
All the tasks that a user would carry out that are associated with the Cableway Branch are initiated from the Cableway Branch Create Tasks window which acts as a task hub.
The Cableway Branch Create Tasks window is automatically displayed once a Cableway element is created or the user can create multiple branches under a single Cableway element. To create multiple branches, on the Cabling System tab, in the Create group, click Branch to display the Cableway Branch Create Tasks window:
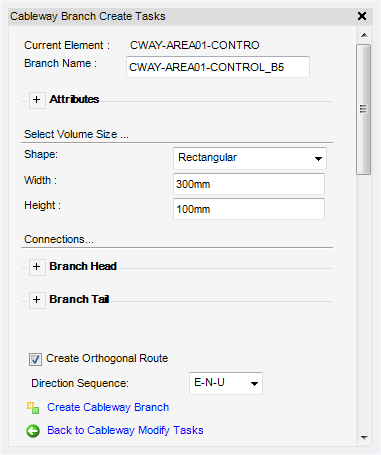
The Current Element is displayed in the Cableway Branch Create Tasks window. The user can enter a name in the Branch Name window.
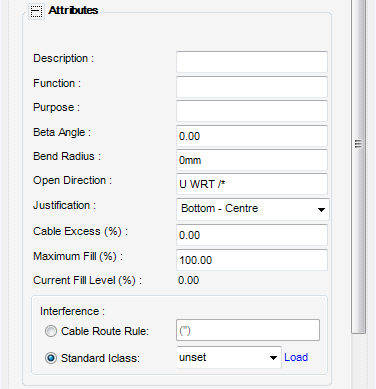
The Attributes part of the Cableway Branch Create Tasks window is used to define the attributes of the branch element.
 |
|||
|
Select from the drop-down menu the type of cable to be routed through the cableway. The user can input its own values or click Load, to load interference values from a database.
|
|||
The Select Volume Size part of the Cableway Branch Create Tasks window specifies the volume size the cableway branch will occupy in the design model.
In Width, enter the width of the cableway branch.
In Height, enter the height of the cableway branch.
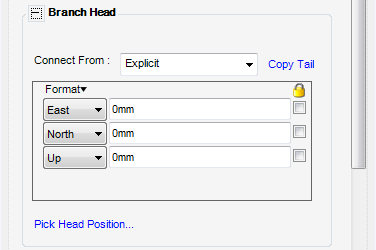
The Connections part of the Cableway Branch Create Tasks window defines the way that the coordinates of the Cableway Branch Head and Tail are derived. These can be changed by selecting from a choice of options in the Connect From: drop-down menu and the Branch Head and Branch Tail part of the Cableway Branch Create Tasks window.
Both the Branch Head and Tail parts of the Cableway Branch Create Tasks window, perform the same function for both the branch head and tail. For the purposes of this user guide only the Branch Head is explained here.
|
•
|
Head of Cableway Branch - Position the Branch Head at the head of an existing cableway branch. The user will be prompted to Pick CWBRAN in the 3D View at the position of the existing branch head.
|
|
•
|
Tail of Cableway Branch - Position the Branch Head at the tail of an existing cableway branch. The user will be prompted to Pick CWBRAN in the 3D View at the position of the existing cableway branch tail.
|
|
•
|
Branch Off - Position the Branch Head at a selected point on an existing branch. The user will be prompted to Pick on the segment from which the branch should connect: to identify the segment.
|
|
•
|
Route Attachment Point - Position the branch head at the position of a selected route attachment point. The user will be prompted to Pick RTTA in the 3D View.
|
Copy Tail - The coordinates of the tail are copied and these are populated in the Branch Head part of the Cableway Branch Create Tasks window.
Pick Head Position - The user will be prompted to Pick to define position (Snap) Snap: in the 3D View. Where the user clicks will be used as the position for the new cableway branch head.
To lock the position of the cableway branch head, click to check the Lock check boxes.
|
Note:
|
Moving the Cableway Branch a specified distance in a particular direction can be done by entering the required co-ordinate values and using the ‘Lock’ boxes on the Cableway Branch Create Tasks window before creating the Branch. Alternatively, if the Cableway Branch has been created, the user can select the Branch and move it into the desired position using the Model Editor. Refer to Model Editor for further information.
|
To constrain the cableway to an orthogonal route, click to select the Create Orthogonal Route check box.
The user can then define the direction that the route takes orthogonally, from the Direction Sequence drop-down menu select the direction.
Click Create Cableway Branch to create a new cableway branch element in the Design database and close the Cableway Branch Create Tasks window. The created Cableway Branch is shown in the 3D view automatically routed along an orthogonal path connecting the Head and Tail positions. The Branch Tasks window is automatically displayed, for more information, refer to Branch Tasks.
Click Back to Cableway Modify Tasks to open the Cableway Modify Tasks window. To modify the Cableway Branch, refer to Modify Cableway Branch.