AVEVA Global User Guide
Setting up a Global Project : Creating Location Files
The following steps create all the files needed for a new location. During the procedure, confirm that you want all the files copied, all the database files that exist at the Hub will be copied to the Transfer directory. The files will all be secondary at this stage. The information supplied on the Create Location window will be stored in the Global database, and then the Global database itself will be copied into the transfer area. The virgin databases in the Project directory will also be copied. A transaction database is also created and allocated to the location.
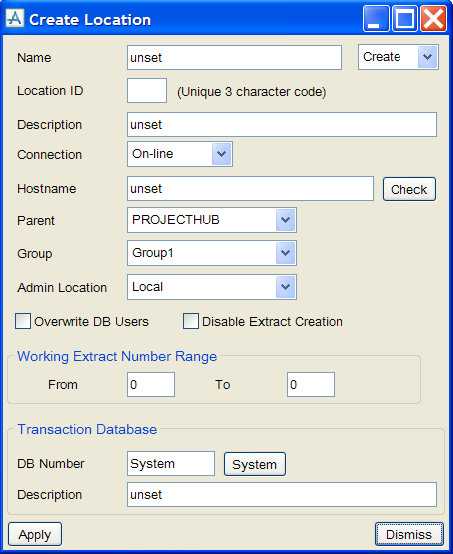
Click Create on the Location version of the Admin Elements window, to display the Create Location window:
The Location ID is a three-letter code that identifies the location.
The Description is optional.
Connection will normally be on-line. Refer to Off-line Locations for further information.
Hostname is the identifier of the machine on which the Global daemon will be running at the location.
|
Note:
|
Make sure that the Location ID and Hostname are correct. Click Apply, the information is written to the Global database for the location, in the Transfer directory for the location. Once the communications link has been initialised, the only safe way to change the machine specified for the daemon is to copy the Global database manually to the location. (Do this by using another data transfer method such as that described in Transfer of Other Data, on a different project.)
|
The Parent option will be set to the Hub name, as this is the only option at this stage.
Groups are discussed in Location Groups.
Admin Loc identifies the administering location. If the location is administered locally, at the location itself, this should be set to Local. If the location is administered from another location, this should be set to the name of the administering location. The Local button will set the administering location to Local.
All Global extracts are given an identifying number when they are created. Before starting create extracts, work out an extract numbering system. Use the Working Extract Number Range to set the range of numbers that are available for working extracts created at a specific location.
Click Apply, the location and its transaction database is created. A prompt to confirm that all the required databases that exist at the Hub to be copied to the Transfer directory, ready for taking to the location. For this example, we will assume that this is confirmed. For more information about making the decision, refer to Database Allocation.


