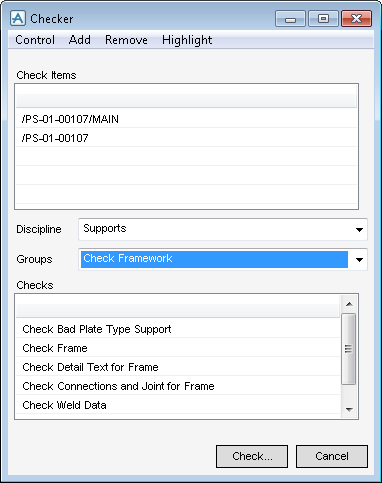
Checker
Checker : Checker
Use the Checker window to add or remove items to be checked, select the checks to be applied to the items, highlight elements for ease of interpretation of the results and to run the checks. Results can also be saved to another location, failed references can be reloaded and the version of the checker can be viewed.
|
Note:
|
All checking operations are controlled from the Checker window. and when the Checker window is first displayed, the Check Items list is empty.
|
The Check Items pane of the Checker window can be populated with which elements are to be checked. Use the Checks pane to select one or more check functions to be applied to those elements.
|
Adds all elements which have failed an earlier check, as listed on a Checker Results window.
|
To remove items from the Check Items list, click Remove and select an option from the drop-down menu.
|
Note:
|
Remove only becomes active when the Check Items list is populated.:
|
|
Removes everything from the Check Items list and removes all highlighting.
|
|
|
Removes everything highlighted in the Check Items list.
|
|
|
Removes the current element highlighted in the Model Explorer from the Check Items list.
|
|
|
Removes all the members of the current element highlighted in the Model Explorer from the Check Items list, but not the current element
|
|
|
Removes elements from the Check Items list by picking them in a 3D graphical view. Any highlighting on the element is also removed.
|
|
|
Removes all the elements in the Collection from the Check Items list.
|
The available check functions are organised into discipline, class and group categories, simplifying the selection of those most relevant to the current design activities. Each class of checks represents, typically, a main design discipline; for example, Structures, Pipework, HVAC, Trays and so on. Each class may have one or more groups associated with it, representing more specific features of the design discipline; for example, HVAC Branches, HVAC Offsets and so on.
Select the required discipline from the Disciplines drop-down list which will automatically update the Groups options.
Select the required group of checks from the Groups drop-down list which will automatically update the Checks list to show all individual checks applicable to the chosen class and group.
From the Checks list, select one or more checks that are to be made on the elements in the Check Items list.
To make it easier to interpret the check results, highlight particular elements in the 3D 3D graphical view. To highlight items in the 3D graphical view, click Highlight and select an option from the drop-down menu.
|
Note:
|
Highlight only becomes active when the Check Items list is populated.
|
|
Highlights all elements that are in the Check Items list. When selected, the Elements Colour window is displayed which allows the highlight colour to be chosen.
|
||||
|
||||
|
Passed is an On/Off toggle. When on, shown by a tick on the menu, all elements which pass subsequent checks will be highlighted.
|
||||
|
Only elements already in the Drawlist will be highlighted; elements are not added to the view automatically. Removing elements from the list will remove the highlighting from the selected element.
|
||||
|
Displays the Passed Colour window, when Passed is activated on the menu, a highlight colour for elements that have passed the check can be selected.
|
||||
|
Displays the Failed Colour window, when Failed is activated on the menu, a highlight colour for elements that failed the check can be selected.
|
||||

