DRAW Administrator Guide
Area Based Automatic Drawing Production : Create and Modify Area Based Elements : Create and Modify Areas
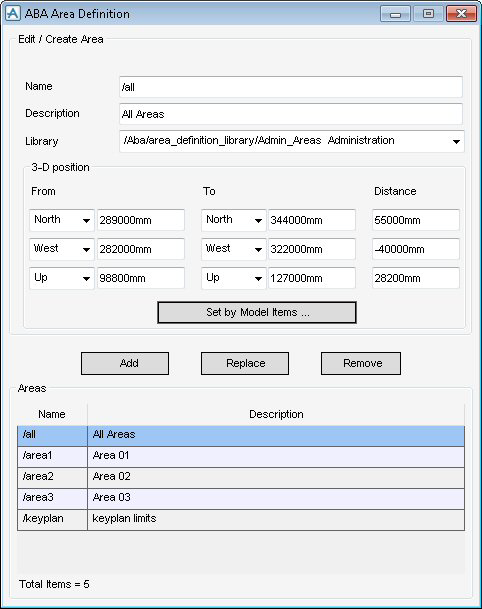
Input a suitable name for the area in the Name field.
Input a suitable description for the area in the Description field.
Select an Area Library in which new areas can be built from the Library drop-down list.
Input the 3D position of the start point for the area in the From fields using the base product convention of North, East and Up (these directions can be changed to South, West and Down using the drop-down list).
Input the 3D position of the end point for the area in the To fields using the base product convention of North, East and Up (these directions can be changed to South, West and Down using the drop-down list).
To set the limits of the area to contain specific items from the 3D model click Set by Model Items to display the Set Area by Selecting Model Items window. Refer to Set Area by Selecting Model Items for further information.
To remove the highlighted area from the Areas list, click Remove. A Confirm window displays asking you to OK the deletion. Click Yes to delete the area.
By default the Name and Description elements in the Areas list are sorted alpha numerically (A-Z, 0-9). To reverse the order, click the column header of the relevant list.
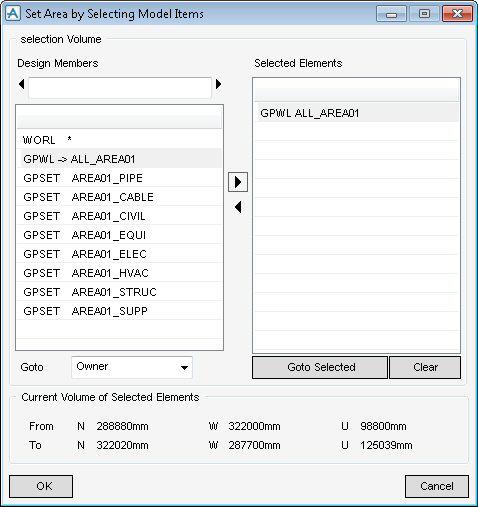
Click  above the Design Members list to navigate to the previous element in the currently selected hierarchy.
Click  above the Design Members list to navigate to the next element in the currently selected hierarchy.
Click adjacent to the Design Members list to add the selected element in the Design Members list to the Selected Elements list.
Click adjacent to the Design Members list to remove the selected element from the Selected Elements list.
As items are added or removed from the area, the coordinates in the Current Volume of Selected Elements part of the window change accordingly (unless the item does not affect the extremities of the area).
Select from the Goto drop-down list to navigate to the required element type in the Design Members list.
To access an element in the Design Members list that has already been added to the Selected Elements list, select the element and click Goto Selected.
Click OK to set the area limits or Cancel to discard any changes and close the Set Area by Selecting Model Items window.